Saturday, 15 September 2012

Death By Chocolate Cake

Last week I did the unthinkable and made a cake that would give even the fittest Olympian a heart attack.

I'd seen similar cakes in pictures posted on the internet and thought I would give a shot at making one. It is the most chocolatey cake I have ever tasted and I'm pretty sure I am now well on my way to being diabetic.

I made two basic chocolate sponges, sandwiched them between chocolate butter icing, slathered more of the butter icing all of the cake, stuck Kit Kats around the edges and filled the base with Smarties. It was glorious!


Next time I attempt to make this, I will be sure to chill the Kit Kats beforehand... they got a bit soft and full of finger marks!

Monday, 3 September 2012

(A Terribly Clever) Apple, Sage and Shallot Tray Bake

I love M&S food and as of today, I love their apple, sage and shallot tray bake. It costs £3.29 for a jar and all you need is some pork and veg.


The M&S 'Terribly Clever' range is extremely convenient for busybodies who want posh dinners but don't have the time to make them. They stock a range of pastes, marinades and mousses that require simple ingredients and instruction. So far I have tried the chocolate mousse and the apple, sage and shallot tray bake. Both were really easy to prepare, affordable and tasted very 'posh'.

For the tray bake, I simply added 6 pork medallions into a freezer bag and shook them up with the tray bake. Then I popped them in a dish and baked them in the oven for 30 minutes. Whilst they were baking, I prepared some mashed potato and vegetables to accompany the dish. In total the dish took no more than 30 minutes to prepare and tasted just like roast pork with apple sauce and stuffing (minus the gravy). Sunday roast without the fuss!


Friday, 31 August 2012

Lemon Ginger Honey

The first time I tried a glass of hot lemon, ginger and honey was in a cafe in Dharamshala, India. I can't get enough of it and drink it like water. In addition to tasting fabulous, it's also a great remedy for colds - I'm starting to look forward to the winter now...

If you love lemon, ginger and honey, you really must give this a try - or even if you have a cold, I would highly recommend it. All you need is boiled water, lemon juice, ginger and honey - all affordable and obtainable from your local supermarket.

Here is how I make it:

Ingredients:

1/2 lemon
25g honey
20g fresh (peeled and finely chopped) ginger - unfortunately I only had pickled ginger but fresh is best

Cooking Accessories:

A small drinking glass/ mug
A spoon for mixing

Add the honey to the glass
Squeeze in the lemon juice (remove all seeds)
Add the ginger
Add the boiling water
Stir and leave to stew for 5 minutes before drinking


Wednesday, 29 August 2012

Philadelphia Freedom

Apparently chocolate Philadelphia isn't new to Americans. Having looked on the US website, they appear to  have every type of chocolate covered. One of the downsides of being a Brit is that you have to wait a bit longer for the news to arrive. I currently have an obsession with the US TV show, Once Upon a Time and found out that series 2 doesn't hit the UK until next year - it airs in the US next month! This is clearly what happened with chocolate Philadelphia...

About a week before this hit the shops, I made a chocolate cheesecake (inventing it as I went along) - I made the topping from Philadelphia and cheap dark chocolate. There I was thinking I was being innovative... a week later Philadelphia with Cadbury hit the supermarkets. Shamefully, I have to admit that it tastes better than my chocolate cream cheese but then it is Cadbury! The best way to describe it - smooth and chocolatey with a heavenly tang. It also tastes great dolloped on digestive biscuits - a cheesecake short-cut.

You can buy Philadelphia with Cadbury for £1.62 from most British supermarkets including; Tesco, Sainsburys, Morrisons, ASDA and Waitrose.


Philadelphia with Cadbury... I love you, yes I do

A Bit Of Wensleydale, Gromit?

I love cheese. I love cheese so much, I once tried to throw a cheese party at university.

It's a very British obsession - I'm sure Wallace and Gromit would agree.

Lunchtime today consisted of crackers and cheese. What I love most about it is the fact that you can have it for a meal or desert. Many British gastropubs (posh pubs that sell posh food) and restaurants serve it as a desert... aka - the 'cheese platter'. I've never tried it as a desert (more of a fan of chocolate-based puddings) but I do love a few crackers at lunch.

What's more, you can have it with every cheese imaginable. My favourites are:

Wensleydale
Stilton
Edam
Brie
Le Roule
Cheddar

Today I opted for:

Ilchester Mexicana Cheddar - £1.19 (140kg) Tesco
Norwegian Jarlsberg - £1.44 (160kg) Tesco
Wensleydale with Mango and Ginger - £2.30 (230kg) Tesco
A slather of avocado (a great combination with the Mexican cheese)

It's quite obvious that the food shopping is done at Tesco but Morrisons (another leading British supermarket) stock a huge range of cheeses, in a variety of flavours. My favourite amongst the three has to be the Wensleydale. It has such a creamy texture - it melts and explodes in your mouth at once. The mango and ginger also give it a fruity/ spicy flavour. I just can't get enough of it and it doesn't surprise me that cartoon characters can't either!


Tuesday, 28 August 2012

I Heart Momos

If you've ever been to India or Nepal (or if you're lucky, Tibet), you'll know what these are.

They're quite simply heaven in a dumpling and come in a variety of flavours. Having been to India and Nepal, I have tried a large proportion of these! Chicken, pork, vegetable, cheese... even mars bar flavoured. The best way to describe them... they're a bit like spring roles filled with flavour!

My favourite to date has to be cheese and vegetable fried momos. I had these in a backpackers hotel in McLeod Ganj, Northern India (home of the exiled Dalai Lama). They cost no more than 100 rupees for a large plate (about £1.15) and I had them for dinner every night we stayed there (which was 4 nights... in a row). I don't think I have ever tasted a bad momo - this goes to show how amazing they are!

I have even managed to find momos back in the UK - I really am obsessed. About a year ago my dad informed me of a Gurkha food store in the military town of Tidworth, Wiltshire. He travelled to Nepal not long after my trip in 2010 and he fell in love with them too. In here we found... FROZEN MOMOS.

If you are ever in India, Nepal or even Wiltshire, I would recommend jumping on the momo bandwagon. They are to die for.


(Vegetable momos at the Pyramid Cafe - Rishikesh, India)

I also recommend:

Om Hotel (as mentioned above) - McLeod Ganj, India
Peace Cafe - McLeod Ganj, India
Gurkha Variety Store, Tidworth, UK

Do it. Do it. Do it!

Pineapple Avec Cinnamon

It really is that simple. 

I wanted some pudding and simply drizzled some cinnamon over a handful of pineapple chunks - it tastes delicious.

To make it more exciting, you can even sprinkle some brown sugar over it and grill it until it browns. This tastes more delicious!

A simple 5 minute tropical twist for desert!


Sunday, 26 August 2012

The Cheap Man's Cocktail

Cava is the cheap man's Champagne... but it's great for cheap giggles.

The first time I tried it was on a girls trip to Spain in 2008 and it really did give us the giggles. It's since made guest appearances during my freshers week at university, numerous birthday parties and every single new years eve. I've always had to mix it with orange juice (aka - bucks fizz) but recently I learnt of a tastier way to my cheap giggles...

Back in my old office we had 'Friday beers'. Every Friday at 5 O'clock (this slowly crept to an earlier time of 4 O'clock) the beers were opened. On a couple of occasions there would be 'Friday Pimms', at Christmas there was 'Friday mulled wine' and on one occasion there was 'Friday elderflower cava' - inspired by one of my colleagues.

It's such a simple addition but it tastes wonderful and all you need is cava and elderflower cordial.

You can get a cheap bottle of cava from Tesco (or most supermarkets) for about £4.50 and elderflower cordial costs about £3 (I prefer the bottle green brand). The ratio of cordial to cava is 1:5 - simply pour the cordial into the glass (as if you were making a glass of squash), pour in the cava and stir it up. You will get about 8 glasses out of the cava and it really is a bargain.

Enjoy with friends and try not to fall over after your first glass.


Saturday, 25 August 2012

Bring Me Home a Hot Irishman

A couple of weeks ago, my Aussie housemate from back in London went on a long weekend break to Ireland. I've never been to Ireland but when I imagine it, it's like a scene from PS I Love You. I imagine Gerard Butler drinking a Guinness in a cosy rural pub. I know this is just a stereotype and Gerard Butler is in fact Scottish but dare to dream...

Just before she left, I asked her to "bring me back a hot Irishman". Little did I know, she would go through with the bargain. Last week I went down to London to see "Jumpy" at the theatre with her, after the show (and a few gin and tonics in the pub) we went back to her place and she presented me with a gift. There under the wrapping paper was my hot Irishman. I kid you not.


Not only did I get my hot Irishman, he also makes "the perfect Irish coffee" - what better way to lose my inhibitions?

My Mate Marmite

You either hate it or you love it. I'm the later of the two.

It's something that I do most mornings and I've turned it into a blog post.

Marmite on toast.

It's a British favourite and personally, I think they should have had a Marmite parade at the Olympic opening ceremony.

There are many different alternatives to it - most notably for you Australians, Vegemite... but as Sean Connery is to James Bond... Marmite will always be the best.

Last year I spent a month helping out at the school my mum teaches at. Every morning on the journey to school, we would plan our imaginary Marmite cookbook, thinking of every possible recipe. 

So far we have come up with:

Marmite roast potatoes (a family favourite)
Marmite mash potatoes
Marmite & cheese fondue
Marmite scrambled eggs
Marmite crumpets
Marmite and cheese spread sandwiches (reliving my childhood packed lunch box)
Marmite on Ryvita (something I lived off at university)

I will have to post recipes for these one day!

When it comes to proportions, I don't like to use too much of it. My mum likes to slather her toast in the stuff -  whereas I like a tiny bit with plenty of butter.

I couldn't imagine a world without Marmite - what would I have for breakfast? What magnets would I have stuck to the fridge as a child? What would I have in my sandwiches?!

Thankfully, I have a large jar stashed in the cupboard. My marvellous, mouthwatering mate Marmite.


Thursday, 23 August 2012

Easy Peasy Peach Preservative

Earlier this evening, I was reading an article about how Princess Kate enjoys spending her free time making jam (amongst other hobbies). As a Brit, I thought it would be a good idea to embrace our love of jam, or as the American's call it - jelly.

I've never made jam before but decided to experiment with some peaches that were on the verge of being binned. I have to admit, my first attempt turned out a little too sweet and sickly. Adding a bit of water and changing the proportions put an end to that.

It's a really simple recipe and takes no more than 40 minutes to make.

Here is how I did it:

Ingredients:

300g of peaches (peeled and diced)
150g of granulated sugar
200ml of water
Juice of 1 lemon

Cooking Accessories:

A saucepan
A wooden spoon
A chopping board
A kitchen knife
Measuring scales
A jar/ storage container


Peel and dice the peaches


Pop in the saucepan and stir on a low heat for 5 minutes


Add the sugar to the saucepan and stir continuously for 5 minutes

Increase the heat and bring the mixture to boil - stirring continuously

Keep stirring until the sugar has dissolved into a syrup


Stir in the boiled water until the syrup has formed a paste

Add the lemon juice


Continue stirring until the mixture has a jam consistency


Remove from heat and leave to cool

Once cooled, pour into a pretty jar or in my case, a storage container, to preserve your pretty peach preservative!


Not Single, Not Double But TRIPLE Chocolate Chip Cookies

On our family road trips across America, we would always make sure there was a coolbox in the back of the car stocked with Cheetos, Mountain Dew and Chips Ahoy cookies.

If you haven't tried Chips Ahoy, you must. 

Back in the 90s, they only had 1 flavour - now they have chewy, gooey and all sorts... but you will never beat the original. Like Sean Connery was to James Bond - Pierce, Roger and Daniel will never compare.

I was so sure I had a photo of me eating some Chips Ahoy lying around somewhere but it appears to have disappeared. Instead, I have a photo of me, aged 3, eating my hands (craving the Chips Ahoy!) somewhere in Florida.


My mum has her own chocolate chip cookie recipe which up until recently we've always used. There's just one problem... they're practically cakes! No offence to my mum, they've served us well over the past 22 years but I wanted my Chips Ahoy! After some experimenting and altering of her recipe (and adding rather too much chocolate to the bowl), I created my super chocolatey chocolate chip cookies - or as I call them, "Not single, not double but triple chocolate chip cookies".

Here is how I made them (sorry they're in ounces, mother is an imperialist):


Not single, not double but triple chocolate chip cookies

Ingredients:

6oz of dark chocolate (the higher the percentage of cocoa the better) – chopped into pieces
4oz of self-raising flour
1oz of cocoa powder
3oz of margarine
6oz of brown sugar (dark or light)
1 egg
2 tsp of vanilla extract
2oz of white chocolate chips (chopped up white chocolate – it’s cheaper)
2oz of milk chocolate (same as above – Galaxy chocolate is a good choice for this)

Cooking accessories:

2 mixing bowls
A sauce pan
A heatproof bowl
An electric mixer/ hand-blender (if you don’t own any of these, just use a mixing spoon)
A wooden/ mixing spoon
A tablespoon
3 baking trays (you can always alternative if you only have ½ or there isn’t enough space for 3 in the oven)
Greaseproof baking paper
A chopping board and kitchen knife (for the chocolate, if necessary)
A sieve
Cling film/ cellophane


Pre heat the oven to 180 degrees

Cover the baking trays with greaseproof paper – add a bit of oil or butter to the top of the paper for extra greasing, if you wish

Melt the chocolate in the heatproof bowl, over a saucepan on low heat – stir continuously to avoid burning

Once melted, remove from heat and leave to cool

Sift the flour and cocoa powder into a bowl – put to one side

In the other bowl, mix the margarine and sugar together with an electric mixer until it is light and creamy

Beat in the egg (please crack the egg in – shells won’t taste great in cookies) and vanilla extract with a wooden spoon

Fold in the flour mixture with the wooden spoon – flour will fly everywhere if you use the mixer. Fold until it is mixed

Pour in the melted chocolate and mix thoroughly

Fold in the chocolate chips and cover the bowl with cling film. Pop it in the fridge to chill for 1 hour

Whilst it’s chilling, why not clean up your mess and save yourself the hassle later... or even eat any leftover chocolate...

Once chilled, place tablespoons of the mixture on the covered baking trays. It’s best to get your hands dirty and flatten them into circles – half an inch in thickness is fine. Please wash your hands first, especially if you’ve been eating chocolate and washing dirty bowls.

Pop in the oven for 15- 20 minutes (to see if they’re cooked, pop a knife into the cookie and remove. If there is any raw dough on the knife, they'll need a bit longer). The longer you leave them in the oven, the crunchier they will get. If you, like me, prefer chewy cookies – 15 minutes should be sufficient.

Once cooked, remove from the oven and leave on the baking tray for 20 minutes – then transfer them to a cooking rack.

Enjoy with milk, ice cream, your friends, you family or better yet, yourself.

Make sure the cookies are stored in an airtight container for lasting freshness!


Wednesday, 22 August 2012

All Round Paella

My first trip to Spain was in July 2007. My best friend's grandad had an apartment in Moraira, Valencia and a few of us from my boarding house spent 2 weeks out there. It was my first trip without my parents/ teachers and we were at that age where alcohol was new and exciting. During this trip, I tried paella for the first time and have fallen in love since. We spent 2 summers in the apartment and ended up trying an array of Spanish dishes - paella remains my favourite.


5 years on, I have tried many variations of the dish but never came around to making my own. As I love to experiment (and because the recipes listed online looked far too complicated/ had expensive ingredients), last night I made my very own paella, from scratch and made it up as I went along. It was a success!

Here is how I did it...

Ingredients:

Meats/ Fish:
3 chicken breasts – diced
4oz (ready cooked) chorizo – diced
180g raw king prawns
180g (ready cooked) calamari

Herbs/ spices
2 tsp paprika
½ tsp rosemary
½ tsp mixed herbs

Veg
2 cups of frozen peas
2 garlic cloves - chopped finely
1 onion – chopped finely
2 medium tomatoes – diced
1 red pepper – diced

Other

2 pints of boiling water
Chicken stock (either 2 chicken stock cubes/ 2 chicken stock gels)
Hot sauce/ tobasco sauce/ chilli sauce
100ml white wine
300g of long grain rice
Olive oil

Cooking accessories:

A large, deep frying pan or wok
Another frying pan for the prawns
A wooden spoon/ spatula for stirring
A deep, large oven dish
A chopping board
2 kitchen knives – 1 for veg, 1 for meat
A Pyrex jug/ bowl
A serving spoon

Pre heat the oven to 180 degrees

Chop and prepare all ingredients – this makes the cooking process quick and simple


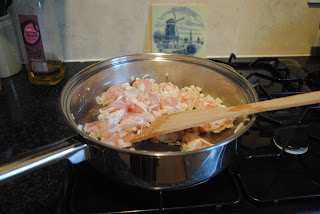
Heat a generous drizzle of olive oil in a large, deep pan (or wok)

Fry the chicken, garlic and onion on low heat


Once the chicken is half cooked, add the tomatoes and red pepper – leave to cook on low heat


In a separate pan, cook the prawns on low heat – once cooked, add to the other pan. Please be sure that the prawns are thoroughly cooked and pink


Sprinkle the paprika, rosemary and mixed herbs into chicken/ prawn mixture and mix well


Whilst this is slowly cooking, get the chicken stock ready by adding two pints of boiling water into a jug/bowl and stir in the chicken stock cube/ gel


Pop the rice into a large cooking dish and add the hot chicken stock


Pop this in the oven for 10 minutes


In the next 10 minutes, add the pre-cooked chorizo, calamari and frozen peas to the pan and stir thoroughly – leaving it on low heat.


Retrieve the rice from the oven and slowly pour the ingredients from the pan into the oven dish – be wary of the hot stock splashing at you


Stir thoroughly; making sure the rice is mixed all over


Mix in the wine and a couple of drops of hot sauce for flavouring


Sprinkle a bit more paprika in if you desire


Pop the dish back in the oven and leave to cook for 20 minutes/ until the rice has cooked – be sure to give it a good stir after 10 minutes


In the mean time you can prepare some salad or bread to go with your paella – I opted for part- bake rolls


If you've still got time, why not set the table?


Or even clean your kitchen – it’s a mess!


Once the paella is ready, serve immediately – add more hot sauce for flavouring, if you wish!


Welcome

I’ve been attempting to write all sorts of travel blogs for a few years now and always end up giving up. I can’t remember much of the first – it was something along the lines of documenting my travels... which is hard when you find that you’re not travelling for periods of time. The second was an attempt to make some money through a budget travel advice blog. Its tone mirrored Aleksandr the (compare the market) meerkat and I lost motivation after 3 posts. Through both, I learnt that you need to blog for the love of it and that you need something to blog about.

I love cooking – a lot my creations were self taught and some taken from my family and friends. I like to experiment with cooking and more often than not, I’m successful... other times, not so much...

I’ve travelled quite extensively and have moved around far too much because my dad is in the army. Born in Germany, I moved to England at the age of 2, living in various locations in Wiltshire, Germany (again), Hampshire, Surrey and London.

Between the ages of 3-16, family holidays usually consisted of big road trips across America/ Canada and various trips in Europe. When I started my A Levels, I began to travel without my family. This is when I began to appreciate it a bit more (much to my regret for not making the most of the trips across America). I spent 2 summers with friends in Spain and then at the age of 20, I made my first independent journey and it changed my life.

I spent 6 weeks in living in a Buddhist monastery in Nepal, teaching monks English. It was such a unique and rewarding experience. I met a lot of friends for life and I even flew over Everest! I have since travelled throughout the UK, Europe and have backpacked through India.

I’m not exactly rolling in the money and can’t find the time to travel every other week, so a blog dedicated solely to travel wouldn’t make sense. However, a blog dedicated to food from where I have travelled does make sense.

I love to write, I love to cook and I love to eat – ergo, I will give you the world at your lips.

Enjoy!